Instalar agente de zabbix en ubuntu 16.04 ?
sudo apt-get updateInstalamos el agente de zabbix 3.4 para ubuntu 16
sudo wget http://repo.zabbix.com/zabbix/3.4/ubuntu/pool/main/z/zabbix-release/zabbix-release_3.4-1+xenial_all.deb
sudo dpkg -i zabbix-release_3.4-1+xenial_all.deb
sudo apt-get update
sudo apt-get install zabbix-agent
sudo update-rc.d zabbix-agent enable
sudo /etc/init.d/zabbix-agent start
Configurar agente Zabbix en Linux
Para configurar el agente Zabbix editaremos el fichero zabbix_agentd.conf asi
vim /etc/zabbix/zabbix_agentd.conf
Donde añadiremos/modificaremos
Server=IP_serverzabbix
Hostname=Zabbix server
sudo /etc/init.d/zabbix-agent restart(En caso de no tener mysql lo podemos instalar asi)
sudo apt-get update
sudo apt-get install mysql-server
mysql_secure_installationmysql -uroot -p -e"GRANT USAGE ON *.* TO 'zabbix'@'127.0.0.1' IDENTIFIED BY 'nuevo_pass_zabbix'"; mysql -uroot -p -e"GRANT USAGE ON *.* TO 'zabbix'@'localhost' IDENTIFIED BY 'nuevo_pass_zabbix'"; mysql -uroot -p -e"flush privileges"
Ahora creamos el archivo .my.cnf asi
vim /etc/zabbix/.my.cnfDonde vamos a agregar
[mysql] user=zabbix password=nuevo_pass_zabbix[mysqladmin] user=zabbix password=nuevo_pass_zabbix
Editamos el archivo userparameter_mysql.conf asi
vim /etc/zabbix/zabbix_agentd.d/userparameter_mysql.conf Buscamos
HOME = /var/lib/zabbix Y lo remplazamos por (Se debe reamplazar 3 veces en todo el archivo)
HOME =/etc/zabbix
Y debemos agrear esto:
UserParameter=mysql.uptime,HOME=/etc/zabbix mysqladmin status | cut -f2 -d ":" | cut -f1 -d "T" | tr -d " "
UserParameter=mysql.threads,HOME=/etc/zabbix mysqladmin status | cut -f3 -d ":" | cut -f1 -d "Q" | tr -d " "
UserParameter=mysql.questions,HOME=/etc/zabbix mysqladmin status | cut -f4 -d ":"|cut -f1 -d "S" | tr -d " "
UserParameter=mysql.slowqueries,HOME=/etc/zabbix mysqladmin status | cut -f5 -d ":" | cut -f1 -d "O" | tr -d " "
UserParameter=mysql.qps,HOME=/etc/zabbix mysqladmin status | cut -f9 -d ":" | tr -d " "
Nuestro archivo userparameter_mysql.conf debe acabar asi
# For all the following commands HOME should be set to the directory that has .my.cnf file with password information.

# Flexible parameter to grab global variables. On the frontend side, use keys like mysql.status[Com_insert].
# Key syntax is mysql.status[variable].
UserParameter=mysql.status[*],echo "show global status where Variable_name='$1';" | HOME=/etc/zabbix mysql -N | awk '{print $2}'

# Flexible parameter to determine database or table size. On the frontend side, use keys like mysql.size[zabbix,history,data].
# Key syntax is mysql.size[<database>,<table>,<type>].
# Database may be a database name or "all". Default is "all".
# Table may be a table name or "all". Default is "all".
# Type may be "data", "index", "free" or "both". Both is a sum of data and index. Default is "both".
# Database is mandatory if a table is specified. Type may be specified always.
# Returns value in bytes.
# 'sum' on data_length or index_length alone needed when we are getting this information for whole database instead of a single table
UserParameter=mysql.size[*],bash -c 'echo "select sum($(case "$3" in both|"") echo "data_length+index_length";; data|index) echo "$3_length";; free) echo "data_free";; esac)) from information_schema.tables$([[ "$1" = "all" || ! "$1" ]] || echo " where table_schema="$1"")$([[ "$2" = "all" || ! "$2" ]] || echo "and table_name="$2"");" | HOME=/etc/zabbix mysql -N'

UserParameter=mysql.ping,HOME=/etc/zabbix mysqladmin ping | grep -c alive
UserParameter=mysql.version,mysql -V
UserParameter=mysql.uptime,HOME=/etc/zabbix mysqladmin status | cut -f2 -d ":" | cut -f1 -d "T" | tr -d " "
UserParameter=mysql.threads,HOME=/etc/zabbix mysqladmin status | cut -f3 -d ":" | cut -f1 -d "Q" | tr -d " "
UserParameter=mysql.questions,HOME=/etc/zabbix mysqladmin status | cut -f4 -d ":"|cut -f1 -d "S" | tr -d " "
UserParameter=mysql.slowqueries,HOME=/etc/zabbix mysqladmin status | cut -f5 -d ":" | cut -f1 -d "O" | tr -d " "
UserParameter=mysql.qps,HOME=/etc/zabbix mysqladmin status | cut -f9 -d ":" | tr -d " "
Y reiniciamos zabbix
sudo /etc/init.d/zabbix-agent restartAnalizis detallado de disco duro con zabbix-disk-performance
Descargamos descomprimimos e instalamos los archivos de configuracion de disco https://github.com/grundic/zabbix-disk-performance/archive/master.zip asi:
sudo wget https://raw.githubusercontent.com/grundic/zabbix-disk-performance/master/userparameter_diskstats.conf -O /etc/zabbix/zabbix_agentd.d/userparameter_diskstats.conf sudo wget https://raw.githubusercontent.com/grundic/zabbix-disk-performance/master/lld-disks.py -O /usr/local/bin/lld-disks.py sudo chmod +x /usr/local/bin/lld-disks.pyReiniciamos zabbix
sudo service zabbix-agent restart
Configuramos zabbix para soportar monitoreo de disco duro:
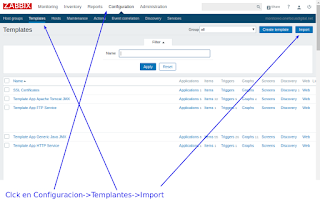
Clck en Configuracion->Templantes->Import
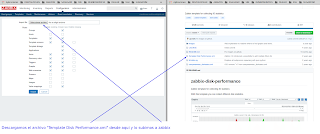
Descargamos el archivo "Template Disk Performance.xml" desde aqui y lo subimos a zabbix
Dar de alta una maquina en zabbix
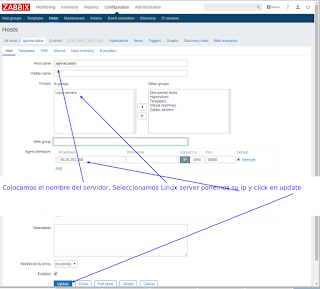
Click en Configuracion->Host->Create host
Colocamos el nombre del servidor, Seleccionamos Linux server ponemos su ip y click en update
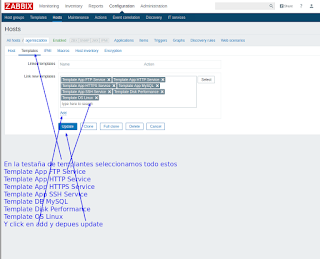
En la testaña de templantes seleccionamos todo estos
Template App FTP Service
Template App HTTP Service
Template App HTTPS Service
Template App SSH Service
Template DB MySQL
Template Disk Performance
Template OS Linux
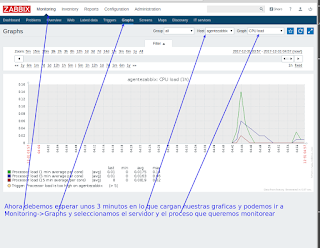
Y click en add y depues updateAhora debemos esperar unos 3 minutos en lo que cargan nuestras graficas y podemos ir a Monitoring->Graphs y seleccionamos el servidor y el proceso que queremos monitorear
